
In Home Assistant, I initially created a simple “holiday” input boolean that I would turn on whenever we went on vacation. When this boolean was enabled, all door and motion sensors in our house would send notifications to us. This gave me a better understanding of what was happening at home while we were away.
Then I discovered Alarmo and everything changed.
What is Alarmo?
Alarmo is a highly customizable alarm system for Home Assistant. It lets you combine your existing sensors to create a flexible security setup tailored to your needs. You can even integrate a PIN code for arming or disarming the alarm, which works beautifully with a tablet mounted on your wall.
Alarmo consists of three main parts:
- Alarmo component: a custom component for HA that controls the states of the alarm panel entities in HA.
- Alarmo panel: a GUI for configuring the settings of your alarm (sensors, delays, actions etc.)
- Alarmo card: a custom card for arming / disarming the alarm.
Installing Alarmo
Installing Alarmo is easy if you have HACS (Home Assistant Community Store) set up.
- Open HACS and search for “Alarmo,” or use my.home-assistant.io.
- Install Alarmo.
- Restart Home Assistant to activate the integration.
- Go to Settings > Devices & Services > Integrations, click Add Integration, search for “Alarmo,” and complete the setup.
The Alarmo panel will appear in the sidebar menu.
Configuring Modes
Alarmo builds on Home Assistant’s Alarm Control Panel integration, which defines five different arming modes:
- Home: Armed home (also known as armed stay) will be used when setting the alarm while people are in the house. All doors and windows allowing access to the house will be guarded, but not motion sensors inside the house.
- Away: away will be used when all people left the house. All doors and windows allowing access to the house will be guarded, as well as motion sensors inside the house.
- Night: Armed night will be used when setting the alarm before going to sleep. All doors and windows allowing access to the house will be guarded, and selected motion sensors (downstairs) in the house.
- Vacation: Armed vacation can be used as an extension to the armed away mode in case of absence for longer duration. The delay times and trigger responses can be adapted (as desired) to being distant from home.
- Custom Bypass: An extra mode for defining your own security perimeter.
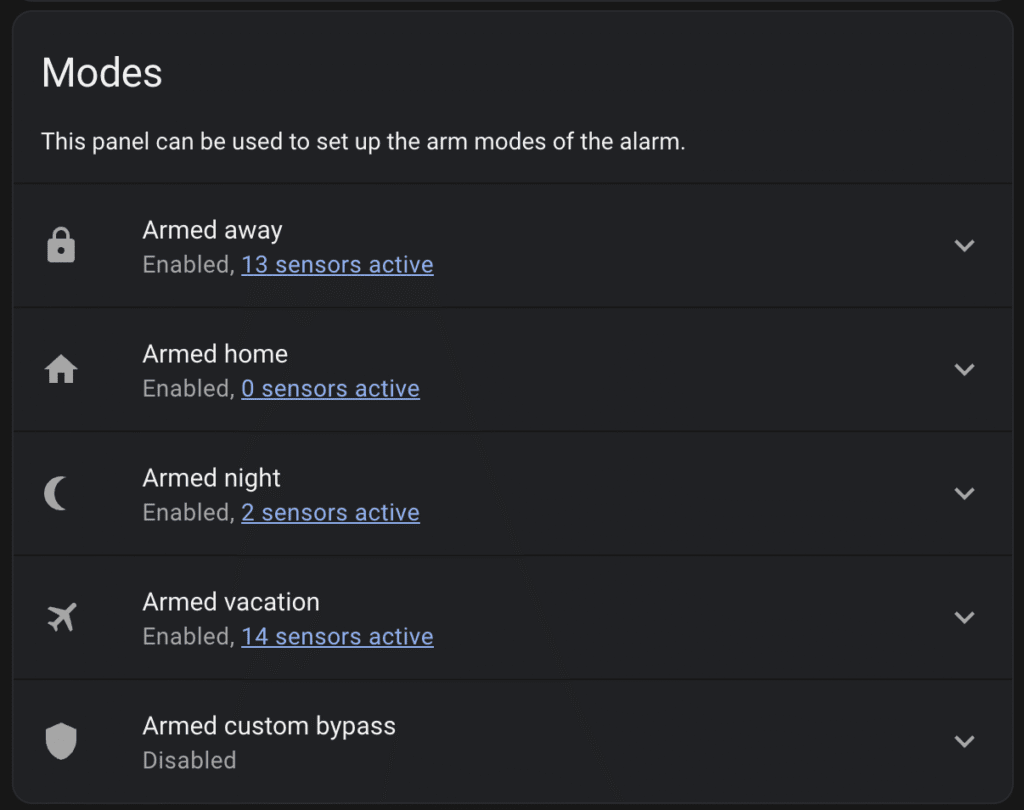
You can enable or disable modes in the General tab of the Alarmo panel. Here, you also set:
- Exit Delay: Time before the alarm arms after activation.
- Entry Delay: Time allowed to disarm after triggering.
- Trigger Time: How long the alarm stays triggered before returning to the previous state

Enabling Sensors
Once you’ve chosen which modes you want to use, you’ll assign sensors to each mode.
In the Sensors tab, you can connect:
- Door sensors
- Motion sensors
- Vibration sensors
- Environmental sensors (e.g., smoke, temperature, water and CO detectors)

To add a sensor:
- Select the sensor and click Add to Alarm.
- Click on the sensor to configure in which modes it should be active.
- For example, you might enable your living room motion sensor when you’re on vacation but disable it in Night mode if your dog sleeps there.
- Click Save when done.

Setting Alarm Codes
Alarmo lets you set PIN codes to arm or disarm the system. This is especially useful when combining it with a wall-mounted tablet interface.
If you’d like to learn more about advanced code management, refer to the Alarmo documentation. In this guide, we’ll keep it simple.
Enabling Notifications and Actions
The Actions tab lets you define what happens when the alarm is triggered.
Common actions include:
- Sending notifications to all your devices.
- Turning on lights or sirens.
- Activating cameras.
To set up a notification:
Customize the message if desired.
- Click Add Notification.
- Choose When (e.g., when the alarm is triggered).
- Select Who should receive it (e.g., all mobile devices).
- Customize your message if necessary

Automating Arming and Disarming
Here are a few practical examples of how to automate arming and disarming Alarmo using Home Assistant automations.
Night Alarm
The night alarm is ideal for activating when you go to bed. A simple script like the one below can be triggered via a dashboard, voice assistant (e.g., Google Home or Alexa), or a bedtime routine in Home Assistant:
good_night_script:
  alias: "Good Night!"
  sequence:
    - service: alarmo.arm
      data:
        entity_id: alarm_control_panel.alarmo
mode: nightTo disarm the alarm in the morning, you can use a motion sensor—such as one on your staircase. This automation checks if motion is detected for the first time between 6:00 AM and 12:00 PM and then switches to Home mode:
- id: disable_alarm_morning
  initial_state: 'on'
  trigger:
    - platform: state
      entity_id: binary_sensor.staircase_motion
      from: 'off'
      to: 'on'
  condition:
    - condition: time
      after: '06:00:00'
      before: '12:00:00'
    - "{{ state_attr(this.entity_id, 'last_triggered') | default(today_at(), true) < today_at('06:00') }}"
  action:
    - service: alarmo.arm
      data:
        entity_id: alarm_control_panel.alarmo
        mode: home
        skip_delay: true
force: trueAway Alarm
To activate the away alarm, you can automate it so it arms whenever no one is at home. This example checks that both people have left before triggering:
- id: enable_alarm_away
  initial_state: 'on'
  trigger:
    - platform: state
      entity_id: person.a, person.b
      to: "not_home"
  condition:
    and:
      - condition: state
        entity_id: 'person.a'
        state: 'not_home'
      - condition: state
        entity_id: 'person.b'
        state: 'not_home'
  action:
    - service: alarmo.arm
      data:
        entity_id: alarm_control_panel.alarmo
        mode: away
        skip_delay: true
force: trueTo disarm the alarm when someone arrives home, you can use this automation:
- id: enable_alarm_home
  initial_state: 'on'
  trigger:
    - platform: state
      entity_id: person.peter, person.marieke
      to: "home"
  action:
    - service: alarmo.arm
      data:
        entity_id: alarm_control_panel.alarmo
        mode: home
        skip_delay: true
force: trueHoliday Alarm
The holiday alarm is typically set manually before leaving for an extended trip. Since this doesn’t happen very often, there’s usually no need to fully automate it.
However, this is where an input boolean becomes really useful. Toggling it can trigger a set of vacation automations—arming the alarm, lowering the thermostat, turning off unnecessary devices, and more:
- id: activate_holiday_mode
  alias: "Activate Holiday Mode"
  trigger:
    - platform: state
      entity_id: input_boolean.holiday_mode
      to: 'on'
  action:
    - service: alarmo.arm
      data:
        entity_id: alarm_control_panel.alarmo
        mode: vacation
    - service: climate.set_temperature
      data:
        entity_id: climate.living_room
        temperature: 16
# Add more holiday-related actions hereConclusion
Alarmo is a powerful and flexible solution that transforms Home Assistant into a full-featured security system without the need for additional hardware. From simple notifications to advanced automations, it adapts seamlessly to your lifestyle and the way you use your home. While it may not replace a professional-grade security system, it’s an excellent way to get more value from the sensors you already have and create a safer, smarter environment on your own terms.